Pages

Wednesday, February 29, 2012

Reduce the Waste challenge results

I just realized I forgot to post the results of the Reduce the Waste challenge we did here- and they're pretty exciting, as far as trash goes!

As you might remember, we purchased a new trash bin that is smaller and fits under our kitchen sink. Our existing trash bin was re-purposed as an indoor place to store recycling as it accumulates.

Some of the things we were going to focus on to help us reduce the amount of waste we generate were:
  • being more conscientious about what we threw away
  • trying to re-purpose and recycle more
  • continuing to compost all food scraps
  • and just using less
I am proud to report that we only had 1 small bag of trash for the 3 of us! Our usual is 1 or 2 completely full bags.

Now that we're 3 weeks into the on-going "challenge", we're realizing even more positive results:
  • Getting even better and bringing bags with us to shop
  • Bringing lunch to work in washable containers
  • Using Glass jars and re-used plastic containers to get bulk items from the co-op
  • Making more food at home to reduce the need for "take-out trash" 
We didn't even have to take out the trash last week- so in the past two weeks we've only generated 1 bag for the whole house! Before we started, I was a bit skeptical about how much we'd be able to reduce our trash generating- we already are big recyclers, and re-purpose some things. I've been surprised at how much less we can use than we did in the past, and all the little ways that trash adds up. If you're thinking about reducing your "carbon footprint", I would suggest setting up some parameters for you and your household, and see what you can cut back on. You might be surprised too!

Monday, February 27, 2012

Dark Days Challenge Week 10- Spinach & Feta Salad

This is so easy, I know. But if you can find local spinach at your Farmers' Market or Co-op, this is a super-quick, easy dinner that is just simple and delicious. It's been one of my favorite dishes to throw together at the end of a long day, and it has everything one could want- lots of greens, a little bit of cheese, some texture from the nuts and apples. Spinach should be available in a lot of northern places by now, and this is a great salad to feature it in!
Spinach & Feta Salad

Ingredients:
3 cups fresh spinach
source: Ferris Farm, Dixboro, MI
1 2" block of Feta Cheese
source: Greystone Creamery, Chelsea MI
2 handfuls Dried cranberries
source: MI cranberries dried at Ypsi Food Co-op
3/4 cup walnuts
source: California :(
1 cup sliced Golden Delicious Apples
source: Wassem's Fruit Farm, Milan, MI


Directions:
  • Chop up Spinach, dice apples, crush walnuts, crumble Feta cheese
  • Mix together in a large bowl, and add dried cranberries and dressing of your choice.
 Serve & Enjoy!

Wednesday, February 22, 2012

Link up with Happy Home!

Since I am utilizing this awesome (no seriously, I really like it) Dynamic view on Blogger, I can't add all the buttons and gadgets and widgets that I'd like to. Instead, I'll just do a good old fashioned shout-out:

If you'd like to follow me on twitter, "Like" my blog on facebook, or follow me on Pinterest, here are the links below to my various pages :) I post on fb and twitter each time I post a new blog entry, as well occasionally posting life musings, interesting articles & helpful links. On Pinterest, I have a variety of boards including some on Gardening Inspirations, Sustainable Living, Recipes, and Home Projects. I'm always looking for new buddies so if your blog has a twitter feed, fb page, etc. that you want to share, comment and let me know!

Companion planting- to do or not to do?

In my garden planning for this year, I'm trying to integrate the concept of Companion Planting. The organizer in me likes the idea of clean, straight row of plants, in beds organized by type, but the gardener side of me knows that companion planting can be beneficial to my plants, and is more in line with the concepts of permaculture. I'm currently reading a book on permaculture called, "Gaia's Garden", as well as "Carrots Love Tomatoes". Both of these have been really helpful places, and let's be honest- I'm probably going to make some stuff up anyway, regardless of what the books say.

There also is a concept out there called inter-planting, or inter-cropping, which is planting placement based on spacing efficiency- planting things with shallow roots next to deeply-rooted things, and making better use of you garden space. I think in the end, I'll probably come out with a combination of both. I haven't made much use of staggered planting dates in the past either, so I'll probably try some of that as well. It's hard, for some reason, to hold back and not start all of the tomatoes or onions at one time.

The in mean time, our seedlings are looking quite good! Most of the herbs are up, the Speckles lettuce is cute and speckled with purple flecks already, and we just potted up the kale today!

Sunday, February 19, 2012

Grow Your Own- Setting Self-Sufficiency Gardening Goals

This year I've been able to check a homesteading goal off of my list- having vegetable storage that
lasts through the Winter! I wasn't able to grow enough of these things for me to only use home-grown veggies through the winter, but I was able to source these things locally all year, to date:

Onions
Potatoes
Sweet Potatoes
Acorn Squash
Carrot
Kale

That means I have been eating all of these veggies, sourced from Michigan if not Southeastern Michigan! I'm pretty geeked about it- all the above veggies store well so I was able to buy a large amount and then store them in our mudroom, and purchase more as needed.
Next year, I hope to grow enough of these things to supply myself with homegrown root veggies all winter! Based on my success this year, here's my goals for next year:

Veggies-
Onions
Potatoes
Sweet Potatoes
Acorn Squash
Carrots

Herbs-
Cilantro/Corriander
Basil
Thyme
Rosemary
Oregano
Cumin
Sage
If you're making your own goals for this gardening season, start with the things you really enjoy! If you love carrots, maybe you want to try to grow a bunch of carrots, and store them in a cool, moist place for the Winter. If you're a squash fan, grow some butternuts or delicatas and save a few for those cold December nights!
Wherever you start, and what ever goal you set, it'll be satisfying to grow some of your own food and to rely on that food in the Winter. Good luck :)

Tuesday, February 14, 2012

Dark Days Challenge Week 9- Homemade Crescent Rolls

Something I've always lusted after, food-wise, is Crescent Rolls. The only ones I've really ever known are the Pillsbury pop-and-peel kind. They always seem like some sort of weird chemistry experiment to me- the container needs to be popped, and then you peel out this weird chunk of dough that is perforated?

I love them all the same, but wanted to find a healthier, homemade, SOLE (Sustainable, Organic, Local, Ethical) option. So here it is!
Homemade Crescent Rolls
Ingredients: (Makes 32 rolls)
3 1/2 cups flour
source: Westwind Milling Co., 50 miles
2 1/4 teaspoons dry active yeast
source: Mexico? I need a better source for this!
1/3 cup water, warm
source: ya know- the tap
3/4 cup milk, warm
source: Calder's Dairy, 50 miles
1 1/2 tbsp sugar
source: grown in the US of A
2 eggs
source: Baer Poultry Farm, 50 miles
1 tsp salt
source: far away, purchased from Ypsi Food Co-op
4 tbsp butter, softened
source: Calder Dairy, 50 miles
Directions:
1. In a large bowl, mix flour with sugar and salt. Dissolve the yeast in the warm water and add to the flour mixture. Add eggs and milk, then mix everything together. Add the butter and knead the dough until it is smooth. Cover with a clean towel and let it rise for 1 hour in a warm area, until doubled in size.
2. Punch down dough and divide into 2 equal parts. Form them into balls. *If you don't want to make a million crescent rolls all at once, now is the time that you should take one of the dough balls, wrap it in plasticwrap, and then wrap tightly in aluminum folil and freeze!*
On a floured surface roll each part into a 16 to 17 inch round, using a
rolling pin. With the back of a spoon, spread about 2 tbsp of very soft
butter onto the dough round. Using a pizza wheel, cut the
round into 16 triangles.
3. Start rolling each triangle into crescents, starting from the outside edge of the triangle. Once rolled, place on a greased baking tray with the tip tucked down and under the roll. Repeat rolling with the rest of the triangles. Let them rise for about 20 minutes. Melt additional butter and brush the tops of the rolls with it.
4. Preheat the oven to 400F. Bake for 14-18 minutes until puffy and golden brown. Let them cool on a wire rack few minutes before serving, or just shove them into your mouth right away, which is what I did.

Monday, February 13, 2012

Seedling check-in


I checked my little seedlings this morning, and they're doing really well overall. I started them on Tuesday, so they're about 6 days old.

The kale seem to be somewhat leggy but I think it's ok, and the lettuce all came up as well. I have a few little onions coming up on the right hand side, and I see a Mrs. Burns' Lemon Basil peeking its head up!

Most of the herb packets said they'd take 10-15 days to germinate, so I'm not worrying yet :) It's so nice to see some greenery indoors, especially in the Winter!


I also wanted to share about an exciting gift I got over the weekend- I did some website work for my aunt and uncle, who own a farm in Toledo, Ohio. I'm in the beginning stages of putting together a business that helps businesses create and develop their presence on the web, through basic web page design, social media efforts, etc. At any rate, my aunt and uncle let me develop a webpage for them, and as a surprise gift for my work, they made me an AMAZING potting bench! They brought it up a few days ago and surprised me- and I was truly surprised!

I decided to put the potting bench in my mudroom- it has access to the backyard, it's sort of a transitional room, and it starts to get really warm in the summer since it's not temperature controlled so it serves as my makeshift greenhouse already. As you can see, it says "Arika's Garden"!, it has a back wall for tool storage, of which I have little to none indoors currently, and they potting tray, (currently filled with canned goods) will be utilized for all my seed starting adventures. Can't wait to use it!

Saturday, February 11, 2012

Reduce the Waste Challenge check in

It's Day 5 of our Reduce the Waste challenge week here at Happy Home, and it is going super well!
We only have about 1/4 of our smaller 20 qt trash can filled, and about 3/4s of our recycling bin! Most of the trash we've generated this week (as you can see) is plastic packaging.

20 qt trash can
35 qt recycling bin
My thoughts on the challenge so far:
  • Being so conscious about our trash his has been a nice visual reminder to buy things in bulk, and has helped us think twice about buying things that are wrapped in plastic.
  • I have been better at remembering to bring containers with me to the co-op for bulk purchasing
  • When you think about what kind of resources needed to be used to make all this plastic packing- for chips, for cookies, for breads, making a loaf of bread at home doesn't sound like such a time-consuming task anymore!
If you've been trying to reduce your waste, what techinques have worked best?
What lessons or thoughts have been provoked because of it?

Friday, February 10, 2012

Make your own Vanilla Extract

Making this at home was really easy! It also seems like it will be a lot cheaper- organic vanilla extract (a small 4 oz jar) was $11 at my local food co-op- woah! For ingredients when making this at home I spent:

$10- 5 vanilla beans
$10- a Fifth of Smirnoff Vodka$6- 2 blue glass bottles
So the total cost per extract was expensive for this round, but I have enough vodka left to make four more bottles of extract, and I also won't need to purchase the bottles any more. Next time I make vanilla extract, it will only cost me $5-8/bottle!


Homemade Vanilla Extract

Makes 16 ounces.

Ingredients:
5-8 fresh vanilla beans (more beans will yield a stronger extract)
2 cups vodka

Directions:
Split vanilla beans and scrape out seeds. Cut pods into 1" pieces. Put seeds and pod pieces into a dark glass jar or bottle. Fill with vodka and fasten and tighten lid. Store jars in a cool dark place, gently shaking the mixture several times per week. For best results, allow to distill for at least two months, if not longer. The vanilla will get better with age. Strain out solids prior to using.

Thursday, February 9, 2012

Dark Days Challenge- Gingered Carrot Soup

It's delicious. It's simple. It uses carrots, which are one of the few veggies you can still find in abundance in the Winter around here.

Gingered Carrot Soup!
Ingredients:
2 tablespoons olive oil
source: far away, purchased frm local food coop
1/2 cup minced onion
source: Downtown Ypsi Farmers Market
1/4 cup grated ginger
source: far away, purchased frm local food coop
2 cloves of garlic, minced
source: my backyard!
2 cups vegetable or chicken stock
source: purchased from local food coop
4 cups sliced carrots
source: my backyard!
1/2 cup half and half or whole milk
source: Calder's Dairy, 50 miles or less
1/4 teaspoons ground cumin
source: far away, purchased from local food coop

Directions:
Heat oil in a large saucepan, over medium heat.
Add onion, garlic, and ginger, and saute until onion is cooked
Now add chicken/veggie stock and the carrots as well
Cover and simmer until carrots are tender- should be about 30 minutes
Take the soup off of the stove and blend in the food processer
Return soup to pot, and add the half and half/whole milk & the cumin
Season to taste with salt, pepper, etc.

                                                               Serve and Enjoy!

Tuesday, February 7, 2012

Reduce the Waste week-long challenge

I am issuing a challenge this week, my friends! This week, starting today, will be Reduce the Waste week at Happy Home, and you too can participate! The rules of the challenge are simple, and can be fitted to accommodate you and your own goals. 

Goals of this challenge:

1) Analyzing all the "trash" you create in a week's time
   -- Sort your waste into trash vs recycling
   -- Set a goal of how much less trash you'd like to have per week
   -- Monitor your progress towards that goal

2) Consciously reducing the amount of trash you create and therefore throw away each week
   -- Before you pitch something, think about it:
           Can it really not be reused or repurposed?
           If not, can you recycle it?

3) Creating a more intentional space for recycling in your home
   -- Investing time, money or even thought into your trash/recycling system will help you be more intention about your efforts, and also will give you a place to put all the trash you save from the landfill, by either repurposing or recycling!

Doing these things will allow us to:

1) Make better decisions when shopping, eating at restaurants, and going about our daily lives (thinking about packaging on groceries, take out boxes and other "disposable" things)
2) Be encouraged to re-purpose things rather than buying new and creating more trash
3) Recycling more of what can no longer be re-purposed or reused

- - - - - - - - - - - - - - - - - - - - - - - - - - -
So in order to set my household up for success, here's what I've done to prepare:

Re-purposed my current trash can (35 qt) into a recycling bin 
-- Before, there was no space for the recycling inside (besides hauling the bright red recycling bin inside and back out every week), so all the recycling would pile up on the counter- ug!      

Labeled the (now) recycling bin so people don't forget about the new purpose and throw trash in there


Purchased a new, smaller 20 qt trash bin (grey one on the left)
-- Hoping that a smaller trash can will remind me to throw away less and will also literally fill quicker so I'll have to stop and think more about what I put in.

Installed a pull-out cabinet system for the new trash can so it is out of the way yet easy to get to    
Announced the challenge my roommate and my partner, and got their buy-in, so everyone is up for the challenge and on the same page
Reduce the Waste- Day 1 trash (L) and recycling (R) 
If you're up for the challenge, set a trash-reduction goal for yourself, and leave a comment! Good night, and good luck! :)

Book Review- The Widsom of the Radish by Lynda Hopkins

I recently picked up a copy of The Wisdom of the Radish from my local library. I just happened upon it- I was browsing through the gardening books and just as Mike asked haven't you read them all already?, I found it. I've been really enjoying these small farm non-fiction books since I've stumbled upon several of them.

I really appreciate that:
a) the authors are my age
b) a lot of them are coming from a similar background to myself aka no farming experience
c) the narratives are a lot of fun to read- It's nice to feel like you're experencing the story right along with the authors.

The Wisdom of the Radish was well written, well organized, and thoughtfully constructed. Lynda, who is the author, writes of the experiences she and her boyfriend  (now husband) Emmett go through starting their own farm, selling at markets, trying their hand at animal husbandry, and other farm-based activites. Lynda and Emmett go through a lot of trials and mistakes during the first year on their farm, and if you're a gardener or  have ever taken on a project that you didn't fully understand the scope of, you'll identify a lot with the author as you read this book. It has a nice blend of humor, serious and heart-wrenching stories, and farm lessons learned along the way.

If you're looking for a fairly easy farm read, pick up a copy of The Wisdom of the Radish- it'll do the trick!

Monday, February 6, 2012

Tackling those lingering home projects

I'm a busy person by nature- I liked to keep occupied. My weekends are usually filled with a combination of reading about projects, dreaming about projects, failed attempts at projects, and successful attempts at projects, in frequency of that order. This weekend, however, was a ACTION weekend: many long-dreamed projects were finished!

handmade spice rack! Turned out so well.
Project #1 Spice Rack
There are two tutorial posts on making this if you're interested, so I'll keep it brief, but at our house we probably have close to 100 spice jars. They needed a more permanent home, and with help from my dad, my roommate, and my husband, an amazingly awesome spice rack was achieved! It will not fly off the wall, it is secure, and it looks pretty damn sweet.

I was so high on the feeling of accomplishment that I made a second, smaller spice rack for above the stove- haha!
so awesome, right?
Project #2-Under-cabinet trash can
We don't produce a lot of trash around here. As a house of 3 people, we only produce about 1-1.5 trash bags per week, which is pretty good. We also do a fair amount of recycling & re-purposing. The current method we use for recycling is piling it up on the kitchen counter by the sink, which is cluttery and drives me crazy! I decided to install a pull-out cabinet shelves, with a trash can attached! I got it from Home Depot, where I would rather not shop, but I'm not a frequent customer there. Sometimes you cave when ya don't want to..

I'm a big fan of it so far, and I'm thinking about using this as our trashcan (it's 20 qts), and using our 35 qt current trash can as an indoor recycling bin. We'll try it for a week and see how it goes- having a smaller can for actual trash might help us reduce our consumption even more. Ideally, we'd be consuming less, and would be producing a lot less trash overall. Recycling is a good first step, but re-purposing and reusing is really better.


less junky Junk Drawer


Project #3- Junk Drawer organizing
My kitchen cabinet drawers always get really junked up, and it becomes so packed that I can't even open the drawer. In the middle of this project frenzy, I spyed some empty berry containers, and decided to re-purpose them.

I stacked them up against each, and added another basket. Then I took every thing out of drawer, sorted it, and then put things back into the smaller baskets. Things are organized by function now, and it feels good! No more jammed up drawer.


Seedlings!


Project #4- Seed Starting!
Today, I started my first seeds of the 2012 growing season!! To be more specific, my roommate and I started them together; Thai Basil, Lemon Basil, Cilantro, Sage, Cumin, and Spearmint. Also started some Copra and Valenica onions, as well as Speckles lettuce.

I plan to keep the herbs indoors for a while to use in the kitchen and suppliment my current flock, and eventually the onions and lettuce will be transplated outdoors to my garden.

We're in the home strech, my friends- only 15 weeks until Southeastern Michian's Frost Free date- May 16th!

What home projects have you been eyeing recently?

Saturday, February 4, 2012

Make your own Spice Rack (pt 2)

This is a continuation, so if you didn't catch the first part, check it out here.
Now that you have your materials, you might need to cut them to size. If you've gotten your boards from a hardware store, they will probably cut them for you for free. Once you've got 'em cut, bring 'em home- they're ready to assemble!

First, you need to make marks where your screws will go to attach the board to the shelves. For each shelf, start 3 inches in on the back board, and space your holes out (I used a spacing of 8 inches between screws). Mark where the holes should be on the board with a pencil, and then drill straight through the back board.  I used a 1/8ths bit.
Once you've got your basic holes laid out, you can use a counter sink bit. This allows you to drill right over your existing hole on the back board, and drill a conical hole. The benefit of this is that the top of your screw will be flush with the board, and when you paint the final coat, you won't be able to see the screws, or at least they won't be as noticeable (see the pic below for a before countersink picture)

Drill your woodscrews through the countersink holes, through the back board and into the shelves, one by one. I like to start by partially screwing in one screw on the left side, partially screwing in the middle screw, then partially screwing in the end screw; this way I can make small adjustments and I make sure everything is equally tight across the board (haha!).

Now you should have a flat back board with two shelves attached to it!


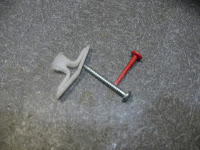
mollie, screw, and the red piece
Next steps are easy:

  • Paint it!
  • Paint another coat on it!
  • Let it dry for 6-10 hours (this is the hardest part for me!)
Last step is to measure out your last set of holes- the ones that will screw the hole spice rack into the wall. To do this, lay your spice rack on the table, face up (shelf side up). Take that pencil you had earlier, and mark out where your screws will go- again I'd go with starting 3 inches in and spacing every 8 inches, but it depends on what sized rack you're making.

Once you've marked out the holes on the board, carefully and accurately mark them on the wall as well. Take your drill, put on a 5/64ths bit, and drill your wall holes. These holes will be bigger than those you drilled for the shelves- these holes are for the mollies.

Pinch the mollies and position them over the holes you've drilled, then tap them in withe a hammer. Once they're as flat to the wall as they can be, take the red piece, and put it into the hole on the mollie. You're pushing until the back of the mollie pops out into the wall. 

Now drill holes into your board with the 1/8ths inch bit, like you did for the shelves. You'll be drilling into the front this time. When you're done with those, you'll want to use the countersink (if you have one) to make those holes a better, conical shape.

You're ready now to drill the screws through the backboard and into the wall (through the mollies). Make sure your board is lined up with the mollie holes correctly- this is a point where you might want a friend to help you hold the shelf up in place.

If you did it right, a) your spice rack should be attached securely to the wall and b) you should have screwed the screws in really tight, and when you run your hand across the board where the screws are, they won't protrude higher than the board! If this is the case, you can use some wood putty and caulk over the holes. Let that dry, then you can paint over the caulking, and you'll have a nice, finished looking product!

If you were like me, and your countersinking didn't get your screws at flat to the wall as you wanted- it's still ok- I'd recommed just painting over the screws, one or two coats. In the long run, you still have a nice spice rack with disgued, incognito screws. Go ahead and put those spice on there!

                                                                          Nice Rack!

Wednesday, February 1, 2012

Dark Days Challenge Week 8- Creamy Polenta

Polenta is easy to make, friends. Damn easy. I promise! Once you make it, it will seem silly to buy one of those pre-made polenta rolls from the grocery store. Polenta is quick to make, it's good, and it's a great host to veggies, meats, and lots of yummy toppings!

Week 8

Creamy Polenta
Ingredients: 
1/2 cup yellow cornmeal
source: West Wind Milling Co, 50 mile radius
1 tbsp salt
source: not local
2 cups water
source: tap water, ya'll!
2 tbsp butter
source: Calder Dairy, 50 mile radius

Cornmeal for polenta
Directions:
  • Get out a deep skillet or frying pan! 
  • Add the 2 cups water, and set to a boil
  • Once water is boiling, add the salt, then add the cornmeal
  • Stir, and bring heat down to low
  • Cook until mixture thickens and cornmeal is tender 
  • Turn off the heat, and add butter. 
  • Stir until butter is incorporated, and add thyme, oregano, rosemary, chives, etc. as desired


                                                    It's that easy. Plate, serve, and Enjoy!

Polenta topped with roasted root veggies