Showing posts with label projects. Show all posts

Saturday, May 5, 2012

Make your own compost bin out of Concrete Blocks

Maybe you're noticing a theme here- I like concrete blocks in the garden. Even more accurate than I like them might be to say that I have a ton, and I'm always finding new ways to use them!

For this project, you'll need to decide how big you want your compost pile to be. Our compost pile is 3 ft across by 5 ft long. This decision should factor in how much you plan to compost (including food scraps, yard waste, leaves, etc), how much space you have, and how "active" or "hot" your compost pile will be.

There are two terms used frequently when talking about compost- Hot compost and Cold compost. Essentially, Hot compost requires keeping track of Nitrogen/Carbon ratios and frequent turning of the compost. Cold compost is more of a "chuck veggie scraps on top of the pile" type of method. Hence the reason why my compost pile is a Cold compost.

Next you'll pick the spot where your future compost pile will be! This is most dependent on the available space you have. I chose to place my pile pretty close to the side of my house - I think the radiant head from the house helps to keep the compost active longer in the winter.

Lastly, you can assemble your compost pile! I used around 35 concrete blocks to put my compost pile together. As you see from the pictures, I staggered each level of blocks.

Once you assemble it, you can add some base material- some finished compost, maybe some leaves, or grass cuttings. As you add material to the compost, you want to keep a healthy balance- 25 to 30 parts carbon to 1 part nitrogen, or 25-30:1. Here's a helpful link to common compostable items and what their carbon to nitrogen ratio is. Good luck as you design and create your very own compost pile! Whether it's a frequently turned hot compost, or a "throw stuff on the top" cold compost like mine, either way you'll be saving food scraps from the landfill or the trash!

Monday, February 6, 2012

Tackling those lingering home projects

I'm a busy person by nature- I liked to keep occupied. My weekends are usually filled with a combination of reading about projects, dreaming about projects, failed attempts at projects, and successful attempts at projects, in frequency of that order. This weekend, however, was a ACTION weekend: many long-dreamed projects were finished!

handmade spice rack! Turned out so well.
Project #1 Spice Rack
There are two tutorial posts on making this if you're interested, so I'll keep it brief, but at our house we probably have close to 100 spice jars. They needed a more permanent home, and with help from my dad, my roommate, and my husband, an amazingly awesome spice rack was achieved! It will not fly off the wall, it is secure, and it looks pretty damn sweet.

I was so high on the feeling of accomplishment that I made a second, smaller spice rack for above the stove- haha!
so awesome, right?
Project #2-Under-cabinet trash can
We don't produce a lot of trash around here. As a house of 3 people, we only produce about 1-1.5 trash bags per week, which is pretty good. We also do a fair amount of recycling & re-purposing. The current method we use for recycling is piling it up on the kitchen counter by the sink, which is cluttery and drives me crazy! I decided to install a pull-out cabinet shelves, with a trash can attached! I got it from Home Depot, where I would rather not shop, but I'm not a frequent customer there. Sometimes you cave when ya don't want to..

I'm a big fan of it so far, and I'm thinking about using this as our trashcan (it's 20 qts), and using our 35 qt current trash can as an indoor recycling bin. We'll try it for a week and see how it goes- having a smaller can for actual trash might help us reduce our consumption even more. Ideally, we'd be consuming less, and would be producing a lot less trash overall. Recycling is a good first step, but re-purposing and reusing is really better.


less junky Junk Drawer


Project #3- Junk Drawer organizing
My kitchen cabinet drawers always get really junked up, and it becomes so packed that I can't even open the drawer. In the middle of this project frenzy, I spyed some empty berry containers, and decided to re-purpose them.

I stacked them up against each, and added another basket. Then I took every thing out of drawer, sorted it, and then put things back into the smaller baskets. Things are organized by function now, and it feels good! No more jammed up drawer.


Seedlings!


Project #4- Seed Starting!
Today, I started my first seeds of the 2012 growing season!! To be more specific, my roommate and I started them together; Thai Basil, Lemon Basil, Cilantro, Sage, Cumin, and Spearmint. Also started some Copra and Valenica onions, as well as Speckles lettuce.

I plan to keep the herbs indoors for a while to use in the kitchen and suppliment my current flock, and eventually the onions and lettuce will be transplated outdoors to my garden.

We're in the home strech, my friends- only 15 weeks until Southeastern Michian's Frost Free date- May 16th!

What home projects have you been eyeing recently?

Saturday, February 4, 2012

Make your own Spice Rack (pt 2)

This is a continuation, so if you didn't catch the first part, check it out here.
Now that you have your materials, you might need to cut them to size. If you've gotten your boards from a hardware store, they will probably cut them for you for free. Once you've got 'em cut, bring 'em home- they're ready to assemble!

First, you need to make marks where your screws will go to attach the board to the shelves. For each shelf, start 3 inches in on the back board, and space your holes out (I used a spacing of 8 inches between screws). Mark where the holes should be on the board with a pencil, and then drill straight through the back board.  I used a 1/8ths bit.
Once you've got your basic holes laid out, you can use a counter sink bit. This allows you to drill right over your existing hole on the back board, and drill a conical hole. The benefit of this is that the top of your screw will be flush with the board, and when you paint the final coat, you won't be able to see the screws, or at least they won't be as noticeable (see the pic below for a before countersink picture)

Drill your woodscrews through the countersink holes, through the back board and into the shelves, one by one. I like to start by partially screwing in one screw on the left side, partially screwing in the middle screw, then partially screwing in the end screw; this way I can make small adjustments and I make sure everything is equally tight across the board (haha!).

Now you should have a flat back board with two shelves attached to it!
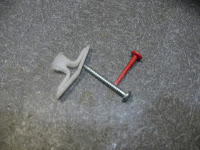

mollie, screw, and the red piece
Next steps are easy:

  • Paint it!
  • Paint another coat on it!
  • Let it dry for 6-10 hours (this is the hardest part for me!)
Last step is to measure out your last set of holes- the ones that will screw the hole spice rack into the wall. To do this, lay your spice rack on the table, face up (shelf side up). Take that pencil you had earlier, and mark out where your screws will go- again I'd go with starting 3 inches in and spacing every 8 inches, but it depends on what sized rack you're making.

Once you've marked out the holes on the board, carefully and accurately mark them on the wall as well. Take your drill, put on a 5/64ths bit, and drill your wall holes. These holes will be bigger than those you drilled for the shelves- these holes are for the mollies.

Pinch the mollies and position them over the holes you've drilled, then tap them in withe a hammer. Once they're as flat to the wall as they can be, take the red piece, and put it into the hole on the mollie. You're pushing until the back of the mollie pops out into the wall. 

Now drill holes into your board with the 1/8ths inch bit, like you did for the shelves. You'll be drilling into the front this time. When you're done with those, you'll want to use the countersink (if you have one) to make those holes a better, conical shape.

You're ready now to drill the screws through the backboard and into the wall (through the mollies). Make sure your board is lined up with the mollie holes correctly- this is a point where you might want a friend to help you hold the shelf up in place.

If you did it right, a) your spice rack should be attached securely to the wall and b) you should have screwed the screws in really tight, and when you run your hand across the board where the screws are, they won't protrude higher than the board! If this is the case, you can use some wood putty and caulk over the holes. Let that dry, then you can paint over the caulking, and you'll have a nice, finished looking product!

If you were like me, and your countersinking didn't get your screws at flat to the wall as you wanted- it's still ok- I'd recommed just painting over the screws, one or two coats. In the long run, you still have a nice spice rack with disgued, incognito screws. Go ahead and put those spice on there!

                                                                          Nice Rack!

Tuesday, January 31, 2012

Make your own Spice Rack- Part 1

I'm not that handy, friends, when it comes to building things. If it involves a drill and a wall and a picture frame, I'm AWESOME at it. If it involves a drill and wood and a saw and measuring acurately and patience, I'm not as awesome. Usually, my impatience wins, and I end up with a crappy looking poorly-made project.

This spice rack was about to meet that same fate- two boards, hung hapazardly on a wall. Then I brought it home to my dad (Nope, 26 years old is not too old to bring a project home for your parents help). What resulted from that assistance was this great idea that I will share with you:

                                         How to Make a Spice Rack (pt 1)

To begin, envision the space where you'd like your spice rack to hang. I decided that the area under my cabinets was just calling out for some better storage so this is my intended destination.

Now, you need to measure the space.
Figure out the height and width of the open space, and jot it down. Also, sounds silly, but measure your spice jars, and write down that height as well.

Next, figure out how many spice jars you'd like to store on the spice rack, and do some calculations. The things you need to know are:
  • How many spices do I need to store?
  • How many shelves will fit in the space?
  • How will I suspend the shelf on the wall so it is sturdy?
The spice rack I've designed is an under-cabinet one. It will be screwed into the wall, and it will hang- not sit on the counter. The space I had to work with was 40" x 19" total, and I also had to factor in the outlets and decide if I wanted to incorperate those into the design or not.

Now you've gotta get the supplies! Maybe you have some spare boards lying around, or maybe you have to go to a big box store, as I did, to get some boards. Make sure you have your measurements written down- you'll need 1 large board that's 1/2 inch thick that is the total size of your open space (40x11 in my case), as well as some smaller 1 inch board for the actual shelves themselves. Many box stores have standard sizes of lumber- here's what I ended up getting:
  • One 1"x4"x8' board for the shevlves
  • One 1/2"x2'x4' for the backing
  • One quart of Valspar latex enamel paint in "Satin Java Brown"
  • a paint brush
  • One box of 8x1-1/4 wood screws (100 count)
  • 1 package of Plastic Toggle 3/8-1/2" Drywall anchors (holds up to 143 lbs)
Tomorrow, I'll post the next part- the actual building, assembling, and installation of your very own spice rack! Stay tuned!

Saturday, November 12, 2011

Putting the Garden to Bed for the Winter


Today, I was overcome with Garden Fever again! Occasionally I will be suddenly compelled to do a crazed home or garden project. Last month, it was making a Root Cellar out of 5-gallon buckets. The month before, it was creating a "built-in" storage area for the jars I've put up. Last winter, it was building an entire seed starting set-up in my basement. Today, it was finally placing the remaining 40-odd cinder blocks that have been sitting in my driveway for 2 years! I muscled-up, and  lifted about 50 cinder blocks to form a reaaally long raised bed- 4 ft x 36 ft! This will add about 144 square ft to my total edible veggie-growing space, bringing the total square footage up to 341 sq ft of raised bed gardening space

New garden bed on side-yard
<----------- Check out the new addition:
I've started planning what I want my garden layout to look like next spring. It's way too early to be thinking about this, I know. But laying out a garden plan is my version of geeking out. Others may play video games, scrabble, or DnD; my "cup of tea' is planning, strange as it may seem.
Canned good "built-in"

This year, there have been several major homestead successes, and several things I'd like to improve upon for next year:

2011 Successes:
+ Two 5-gallon Root Cellars
+ 36 sq ft extra garden space
Winter veggie storage
+ Tried seed starting indoors
   - started zuccs. & tomatoes
 + Made additional storage for canned products
 + Winter veggie and bulk good storage rack added

Improvements for 2011:
+ Add 144 sq ft of garden space
+ Grow enough carrots, onions, & potatoes to eat in summer and last until January
+ Grow and dry more beans- goal= 2 pints of dried beans
+ Try to start everything from seed indoors this year (except for carrots, onions)

Sunday, April 18, 2010

Seed-starting project

An idea has been rolling around in my brain for the last several days... and idea for a project.

Because can you ever have too many house-related projects? Evidently, I am on the road to find out :)

In our basement, we have a "furnace room" which is basically a 9x14 room that has our furnace in it, our hot water heater, but also- some awesome shelves.
Here's a wonderfully accurate drawing of what that room looks like: -------->

Those shelves on the right hand side are built right along the wall. They're probably 8ft across and a total of 6 feet high, and I believe (describing from memory here) that there are either 4 of 5 shelves total.


 Here's what they look like(ish):
                                               
What I am hoping to do next year is........

make a seed-starting area on these shelves!

I've been researching indoor seed-starting to see what I would need, and I think these shelves might be perfect! Individually, they seem to be about a foot apart, and that might be far enough apart for certain types of plants if I rigged some florescent light bulbs under the shelves.

Then I could just buy (or save) seeds next year and start things in my basement! When the seeds have developed into little plants, I could transfer them out into my beds, under a cold frame, and I could have lettuce and other cold weather crops a lot earlier!

Here's a useful tutorial on About.com re: Seed Starting 

Monday, March 22, 2010

They're here!!!

Well, my crazy robot-neck is slowly turning human again.. thank you Ibuprofen 800 Mgs!

Yesterday, after much anticipation, my cinder blocks finally were delivered- 225 of them! (that's 3 pallets if you're a constructiony person). Thank god there were two 20-year-old boys to unload the blocks- it would have taken me 10 hours, no kidding!


Most of them are now resting in my driveway (see above), but Sara and I did place a few to see what kind of bed configuration we would actually be having. I think they look pretty good!

Here's some pictures of the bed:


Also, my mom took this mosaic tile class, and she made us this awesome address plaque for our front porch:


Neat, huh?!

I need to check out all the blog posts I missed while I was in Columbus for the weekend!!
Two Frog Home, IBKC, Adventures in Urban Homesteading, Mark Maynard, & Little City Gardens here I come! :)

Tuesday, September 29, 2009

Thank god for family!

Whew! just coming off of a LOong long weekend of home projects! Whenever my parents come to visit, we always have to have activites planned for some reason- by the time they get here we've usually got a full weekend planned! They're so experienced with house stuff too, which also makes it easy to schedule a million little fixer-uppers to do!


We worked on the yard this weekend- we put mulch on the front beds and then we edged-out a border for what we want the backyard "pit of despair" to look like. We have an area to the right of the garage that slopes downward and is covered in complete shade by a huge Norwegin Maple tree. Right now not much is growing there but my hope is to get some shade and drought-tolerant ground cover in there that is native to MI!


We also weeded and clear some additional beds in the back that were looking a bit scary!They were pretty prairie-like, which is cool, expect that area in going to be part of my edible gardens now! Here's a before:

Once we clear the garden, we smothered it, using about 8 sheets of newspaper, and then we put some half-composted leaves on top. I'm going to leave that mixture on there until the spring, and hopefully the garden will be all awesome and weed-free by then! My aunt and uncle own a farm, and they gave me some llama poop to use as compost/manure- I hear it really helps plants grow strong!

My dad also helped us sand down a few things that needed sanding, like our dining room table, and that cool canning cabinet I'm going to be using to hold all the food I put up for the winter!

Painting is coming along well. Here's what we have to finish up still:

  • finish the Basement Bijou Red (Behr) and Radiant Sun (FreshAire)
  • paint the bathrooms (1 upstairs, 1 downstairs) Treasured Jade (FreshAire) and Radiant Sun (FreshAire)
  • paint the hallways Radiant Sun (FreshAire)
  • paint the Mudroom Radiant Sun

I think I'm just going to wait and clear the beds for the Raised-bed gardens in the spring. I don't get the paper so I don't have any newspaper to smother the grass with anyway- so I guess I'll just dig it up in the spring?

Other than that, I have apples left to can sometime this week, and I'm thinking applesauce, applesauce, applesauce!

Thursday, September 3, 2009

running on empty

Well we are all moved into our new place! I suprisingly remembered to take a few before and after photos, so I could remember what the house looked like before we improved it/made it worse :)

So far, since August 19th, we have done these improvements:

  • Cleaned the whole house
  • Painted Sara's room
  • Painted our bedroom
  • Painted the living room
  • Cleared and re-planted the front garden beds
  • Cleared out the back garden area
  • Trimmed the front trees
  • Trimmed the apple and maple trees in the back
  • Cleaned out the gutters on the roof, and used the compost for the front gardens
  • Ripped up linoleum in the kitchen and mudroom
  • Tiled the kitchen and mudroom
  • Got TV and internet installed

Next up for the month of September are:

  • Paint the office
  • Paint the dining room
  • Paint the kitchen
  • Paint the mudroom
  • Set up the office
  • Buy a new water heater
  • Set up composter
  • Sand down dining room table and re-finish
  • Set up dining room

That's not too bad.. right???

There are two kitties that can't WAIT to run around in the basement and the kitchen! Every time I open the dining room doors (where the "construction" is happening) the babes try to squeeze through like crazycats!

I'm finding out that homeownership is a full time job.