Showing posts with label herbs. Show all posts

Tuesday, August 14, 2012

The Importance of Experimentation in Gardening + DIY Lemon Balm Cleaner

I'm admittedly picky at times. I'm not always a try-er of the newest things. However, I think experimenting, testing, and "giving things a try" is really important to continued success in the garden.

Our gardens are affected by so many factors- pests, weather, water and soil conditons.. as gardeners we have to be ready and willing to adapt, change our plans, and accept the results that nature gives us.

I've been reading Founding Gardeners (which is a great book, btw) and thinking about experimentation and observation. Jefferson, Washington, Adams, Madison and Franklin all had very high regard for the role of trials and experiments in the garden, and devoted whole sections of their land and gardens to that very purpose. This has gotten me thinking about all the little ways I've experimented in my garden over the few years of its life.

Lemon balm in my garden
 Almost every "experiement" I've done in the garden or in the kitchen has probably been done before many different ways, but I still think there's merit in trying things for oneself. Most of my awesome projects; concrete block raised beds, my DIY 5 gallon bucket Root Cellarshomemade Vanilla Extract- those were all "experiments" or trials that I got an idea to do, and did!

Sometimes the idea occured to me first, sometimes I was looking for a solution for a problem and found ideas that I figured I could try out. Either way, because of the room I've given myself to try these things, I now have products and advantages I wouldn't have otherwise; an awesome urban garden with extra space for herbs, a successful way to store carrots and potatoes right up until late spring, and high-quality, low-cost vanilla extract!


An experiment I just stumbled upon recently is this Lemon balm drying project that I wanted to try out.

DIY Lemon balm Cleaner

I planted Lemon balm this year, with no real thoughts on how I would actually use in, whether in cooking, medicial or other useage. I was googling how to dry Lemon balm at home, and I saw a few methods- oven drying, a electric dehydator, but one method stuck out in the reading- laying the Lemon balm out on a towel in front of the dehumidifyer- what a creative idea! We already run a dehumidifyer nearly 24/7 in the summer, so why not use the hot air that is getting sucked in to the machine to dry the herbs? Yesterday night I picked some Lemon balm from the garden and laid it out on a kitchen towel. I spread out the towel on top of the ottoman in the basement, and scooted it up in front of the dehuminidifer, as pictured.

When I came down this afternoon to check, less that 24 hours later, look what I found:

Perfect, right?

I thought the leaves would take at least 2 days to dry out! It's taking a lot of restraint not to fling out into my garden and just start harvesting all my herbs to run the same experiment! I do think I'll try drying some Lavendar this way, as well as some bundles of Thyme, as our nice weather draws to a close in late Fall.

Because the Lemon balm dried so nicely, I was already able to start an infusion to make a Lemon balm scented cleaner this evening!


I crushed up the leaves a bit and add them into a bottle of white vinegar (1 cup) in a spray bottle. Supposedly, the leaves can be left in the bottle for few days to infuse, and then I can strain them out and I'll have a great, fresh Lemon balmy scented vinegar. I'll add 2 cups of water to that, and have a great homemade cleaner! As someone who regularly ulses a just vinegar + water mix, I am definitely looking forward to a more pleasant scent- maybe Lavendar or Rosemary scented cleaner will be next on the list?

I'll definitley report out on my facebook page about the results- I have a feeling I might have to try a different preportion of vinegar to water in order to get that lemony-fresh scent I want.

Keep trying things, even if they don't always work out- Our Founding Fathers would applaud your efforts :)

Thursday, July 12, 2012

Drying and Curing Veggies & Herbs from the Garden


There's lots of things growing in your garden right now (or waiting for you at the Farmers' Market) that you can dry and essentially preserve for use later on in the season. I personally think that is one of the most awesome aspects of growing your own- the ability to have a Winter's supply of some great thing you worked hard to grow! I know, I know- I'm a nerd. While I won't cover all of them in detail, and this isn't an exhaustive list, there's a lot to be saved from the garden come late summer/fall time!

Produce/Herbs that you can Store by Drying:
Almost any herb
Beans
Chamomile blossoms
Cilantro (into Coriander)
Garlic
Onions
Potatoes
Squash


Cilantro

When to Harvest:
You can simply let the plant flower. Little white flower clusters will form, which will soon form seeds. At first, these seeds will be green but then they will slowly dry from green to brown, then they will harden. 

How to Cure/Dry:
The nice thing about cilantro is it's very low-maintenance to dry. When the seeds are dry, you can just pull the whole plant out by the roots, and harvest the seeds from it. 

Long-term Storage:
Put seeds in a glass spice jar or air-tight plastic container. Grind into a powder as needed, and use in asian dishes (or any dishes, for that matter!)

Chamomile

When to Harvest:
The chamomile plant will produce little white flowers with yellow centers- they look sort of like daisies. Plants bloom in mid June-late July. When the petals begin to droop down, time to harvest! Pluck off the individual flower heads and new ones will grow.
How to Cure/Dry:
Spread flowers across on a dry surface in a warm, dry area for 72 hours.

Long-term Storage:
Store in a glass jar, a tin, or an air-tight plastic container. Put a tablespoon of blossoms into a tea bag for chamomile tea any time you desire!

Garlic
When to Harvest:
Garlic plants have corn-like stalks. When stalks start to turn yellow-brown with 5-6 green stalks remaining, it's time to harvest. Grab each plant firmly, near the base of where the plant meets the ground and pull.

How to Cure/Dry:
Garlic needs to cure (dry out) for a week + before it is stored permanently. If you don't have pest problems, harvest your garlic and simply lay it on top of the soil to dry, on your porch, or bring it in and lay it out in your mudroom.

Long-term Storage:
Once the stalks are completely brown and feel like parchment paper, you can cut them down to several inches in length. Garlic needs good air circulation in order to store well. I recommend a wicker basket, or if you only have a few heads of garlic, one of those ceramic garlic containers.


Onions
When to Harvest:
You can harvest onions then the tops/stalks have start to brown and droop towards the ground. (Or if you're impatient, whenever you want, as demonstrated in the picture) The longer you can be patient, the larger the bulbs will be. If you harvest them too early, just use them as a bulb and a green onion too!

How to Cure/Dry:
Lay onions flat out on paper or some other type of dry surface. Onions are like garlic in that they need to cure for several days for optimal storage.

Long-term Storage:
Again, like garlic, onions need good air circulation to prevent them from rotting during storage. A hanging wicker or mesh bag could work well for storage.

Best of luck as you try out some drying/curing at your own home.
I hope the tips are helpful!

Friday, June 8, 2012

Friday Favorites

Some of my favorite things Friday are:

These hostas- aren't they gorgeous? I always admire this specific variety at a 
certain house in my neighborhood- they're like fine art!


 All the herbs in the garden are filling out and looking nice! 
Below are thyme and oregano.

This techincally happened earlier on in the week, but my little sis graduated from High School!!! 
This is us on Tuesday:


This is us in 2005 or 2006,a year or two after we were matched:

So proud to call her my sister :)

Happy Friday, friends!


Wednesday, May 23, 2012

What's Up Wednesday


Most of the herbs I started indoors are establishing outside really well! The cilantro is starting to bolt though- I think I'll start those from seed outdoors next year.

The walking onions I got from my neighbors look so fun- they have little curly tails and they'll start to flower soon- if I'm correct I think they'll start to bend down to the ground and will spreads!

The Leeks are fattening up, finally. Every day I want to pull them out and eat them!
Woah! So green, right? Makes me happy every time I look out the window :)


What's Up in your Garden today?

Monday, May 21, 2012

Springing into Summer

Almost everything I started indoors under lights has been transplanted outside to the garden. One of the last things to go out, yesterday, was little German Chamomile starts (on Left). I hope they do well- this is my first year growing lots of herbs so we'll have to wait and see! Harvesting chamomile blossoms and drying them to make tea is definitely on my list of Self-sufficiency Nerd goals.

The garden is growing GREAT- there's so many tones of green out there! We're just about at the point here of planting summer crops in S.E. Michigan; tomatoes, peppers, cukes, squash, and more.

I've been consistently harvesting lettuce and kale from the garden, as well as a few spinach leaves, chives, and green onions from the plants my neighbors gave me. The beans and peas are doing nicely, and the potato plants are shooting up- it's about time that I mound up the soil around them, now that they're getting taller. Leeks seem to be fairing well- the jury's out on whether or not my toilet paper roll blanching method is truly working. The lettuces are starting to bolt and get a bit bitter, so we'll be having lots of salads for dinner this week!

I've started to plant a few tomatoes and peppers outdoors. All the ones I started from seed indoors didn't do very well, but I put them in the mudroom to get some natural sunlight and they've been perking up. If you didn't start any seeds of your own this season, head out to your local nursery and buy some locally-grown transplants :) 


How's your Garden Growing?

Tuesday, May 1, 2012

Kitchen Gadget acquisition!


A month after I post about my Kitchen Gadget wishlist and I've already knocked two items off of the list- Whoa!

For my birthday, which is coming up here in a few days, my aunt and uncle got me an awesome 12" cast iron skillet from Cabelas! My uncle is a great cook, and has really gotten in to trying new and creative recipes- it's nice to talk about gardening and gadgets when we visit each other! I'm pretty psyched to use this skillet, and when I break it in, you know I'll be posting about the awesome recipes I try and how to care for it! Skillet Cornbread wins as first skillet-made recipe, hands down.
I also crossed another item off of the list-my mom gave me this Mortar and Pestle set (pictured right), which has evidently been in my family for several generations. I think that it might have been in my family since the Bronze Age- look at that thing! It's sort of a crazy shape, it's narrow and deep, and it seems to be made of brass or something- when I tap it, it sounds like a gong. In short- it's totally awesome.

I'm half-laughing just looking at the picture right now. Does it crack anyone else up? When I set it next to the granite mortar and pestle that my roommate has, it looks totally weird, and it's reeeally heavy. I'm collecting all of these new gadgets that double as weight-lifting equipment :)

I'm excited to use these two tools- cast iron seems to be really versatile and it's so neat that it can go from stove to oven. The mortar and pestle will be great for all those herbs I'm growing outdoors this season!

Thursday, April 26, 2012

Herbs in the Garden


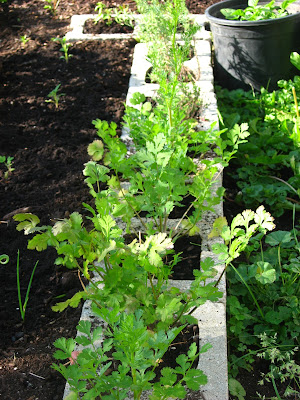
I have big plans to plant a lot of herbs in my outdoor gardens this year. The double-edged sword of concrete block raised beds is the 2 openings in each block- they're a great space to do some extra planting, but they're also a fun space for weeds to quickly crop up!

For the past several years, I've just planted herbs right into the garden, but as I expand my plant list each year, space is at more of a premium. So this year I thought, "Why not plant herbs right into the blocks themselves?"


I'll dry some of these herbs, use some fresh- when you grow them yourself, herbs are so much more flavorful! They add a lot of zing to dishes, they're pretty, and fragrant too- what's not to love?

So far, I've taken a few of my indoor herbs and transferred them back outside- two rosemary plants, an oregano, and a thyme plant. I also had a few lemon thyme plants that survived through the winter, and they got plopped into the holes as well.

They're handling the transplant well! Also inside under lights, waiting to be transplanted are Globe basil, Thai basil, Lemon basil, cilantro, sage, chamomile, lemon balm, bronze fennel, and more thyme. All in all, I'll have about 20 herb plants ready to line some of the raised beds out back.


What types of herbs do you have planted in your garden? 


Any new ones in the plans for this year?


Friday, April 20, 2012

Tour of my Urban Garden


I spend a lot of my time on this blog posting about my garden and the veggies & fruits within it. I thought I'd give an overview of all the food-growing space I have, so those of ya'll who are interested enough to visit again could better visualize the space!

We live on a small city lot, between two streets that forks out in a "V" shape. The lot is about 1/10th of an acre- pretty small! Right now, all of the edible gardening I do, minus some herbs like lavendar and russian sage, are in the backyard. Currently. nearly one whole side of the backyard is devoted to edible gardening. Here's more about the spaces I grow in, and what I grow there!

Vegetable Beds

Raised Bed gardens
First stop on the tour is my vegetable gardens, and my favorite part of my outdoor space!  My veggie gardening mostly happens in concrete block raised beds, which we installed over the past several years- first we started with just the "S" shape you see in the foreground of this picture. The next year, I added the little tail that extends it closer to the house, and then this past fall I added a whole other section that runs up the side of the house up to the front fence.  All in all, this area totals about 260 sq ft.


What's planted in this space is the bulk of the vegetables I grow throughout the year.

Staples always on my planting list include:
potatoes, onions (sets, seeds, or transplants), tomatoes, carrots, peppers, lettuce, bush beans, and garlic.


New additions this year include:

spinach, kale, leeks and sugar snap peas.
Asparagus bed
This season, I cultivated a 10 ft x 1ft Asparagus Bed on the Right side of the house. I haven't seen much action out there so far, but I'm hoping these plants establish. I chose two varieties- Jersey Knight, and Purple Passion. They're a nice addition to the variety of edibles I grow!

We'll see how they do. Anyone have any asparagus advice?


Space for Herbs
During the Spring-Fall, I start seeds indoors using my homemade seed starting shelves. During the Winter months, these shelves have another function- keeping alive more tender herbs that wouldn't produce well outdoors!

This is the first year that I bought/brought in herbs for the Winter, and while I didn't have enough to use them tpo often, it sure was nice to use a little homegrown oregano or thyme now and then!

I ended up planting all the herbs outdoors, in the holes of my cinder block raised beds!

Backyard Fruit
In my backyard, I have several fruit areas, where I've taken advantage of space and sun to grow some sweet treats!

Raspberries
As of this year, I have 7 black raspberry canes- 4 along the back inside fence, and 3 that I transplanted on the side of the house by my raised beds. These really produced for the first time last summer, and it was such a pleasure to walk out back and pick a few berries! The canes I have (not sure what variety I have) produce small, purple/black berries that are really sweet.

Apple Trees
In addition to raspberries, we also have apple trees (planted super-close to the garage for some reason) and several small blueberry bushes.
The apple trees produce small apples that squirrels love to pick off and throw around my yard and eat. This season is going to be the season that I show those squirrels who's boss. I want to eat a few apples, damn it!

Blueberry bushes
The blueberry bushes have been kind of overshadowed in weedy beds for the past several years so this year I dug them up and re-planted them where the majority of the raspberry canes are. I hope they do better in that location- it would be great to have a small, steady crop of blueberries.

I'm also supposed to be getting an apricot tree delivered soon- still looking for a home for that!


Dwarf Cherry trees
We purchased these two dwarf cherry trees last year although one was mis-labeled as an apple tree- whoops! Last year we harvest 1 cherry from each tree which cracked me up! There are lots of blossoms on the trees this year and they've grown some- crossing my fingers for like 8 cherries per tree this year!

In the future, I'd love to add some grapes, as well as some hardy kiwifruit. Both of those grow well on arbors and trellises and it is easy to find cold-tolerant varieties. It's important for me to not get too carried away though- I want to make sure I can manage the garden and plants that I have now and make sure they are healthy and fruitful!

Tuesday, April 10, 2012

A Locavore's Kitchen Gadget Wishlist

This post is a bit hard for me to write! I spend a lot of time reducing, reusing, and trying to re-purpose; I'm trying to get out of the habit of buying new things just because I want them. However, as I have gotten more into cooking for myself, canning fruits & jams, and eating seasonally, I'm discovering a few kitchen tools that would expand my capacity to eat locally and in tandem with the seasons. If you've had any experience with these tools, I'd love to hear feedback and thoughts! 

Mortar and Pestle


I had never used one of these guys until our buddy Paul moved in to our house this past fall. I had jars of herbs like whole clove and coriander that were just sitting around, unused; I didn't know what to do with them! Now that I've had the use of a mortar and pestle for the past 6 months, I will definitely need to get one when Paul moves out; especially since I'll be harvesting lots of coriander and other herbs from the garden.


Presto Pressure Canner


This one has been a long time coming! I've been canning for nearly 4 years. I love canning fruits, but there's only so much jam a person can stock up! A friend lent me her pressure canner, and it was great to use in the end of summer- I canned up sweet corn from the end of the season, and  the last round of green beans fresh from the Farmers' Market. I need to stop holding the borrowed canner hostage :) While I am all for sharing, and really appreciative to have borrowed it, I could use a pressure canner of my own.


Family Grain Mill
Hand Base + Grain Mill 


As I mentioned last week, I'll be splitting a full share of a CSA called Stone Soup Roots and Grains! Part of my share will include (over the course of Sept-March):

- 30 lbs. wheat berries
- 12 lbs. rye berries
- 12 lbs. oat groats
- 6 lbs. dried corn


Wouldn't it be totally awesome (in a completely geeky way) to be able to hand grind my own flour that was grown and harvested less than 100 miles from me? Call me silly, but that's just downright romantic! 


10" Cast Iron Skillet


Again, this is a story of "I didn't know what I was missing until our roommate had awesome kitchen tools". Cast iron skillets are a) really efficient  b) awesome c) durable. I also love the idea that they're low-tech and that people have cooked in cast iron for hundreds of years. I think I'm a convert, people!
Pasta Maker

Ok- I don't really need a pasta maker. This one is more of a guilt please. But I am a fan of the hand-crankiness of it, and with all that hand-milled flour I'll be processing, there's gotta be some pasta making that will happen, right? This particular model is also a meat grinder and a mincer. I think the idea of grinding meat and pasta in the same tool is a bit gross, but I guess I'd get over it if I needed to. You can laugh if you want- I'll be over here swooning over the thought of handmade pasta.

What's your favorite kitchen tool or gadget? Any suggestions for me?


Monday, February 6, 2012

Tackling those lingering home projects

I'm a busy person by nature- I liked to keep occupied. My weekends are usually filled with a combination of reading about projects, dreaming about projects, failed attempts at projects, and successful attempts at projects, in frequency of that order. This weekend, however, was a ACTION weekend: many long-dreamed projects were finished!

handmade spice rack! Turned out so well.
Project #1 Spice Rack
There are two tutorial posts on making this if you're interested, so I'll keep it brief, but at our house we probably have close to 100 spice jars. They needed a more permanent home, and with help from my dad, my roommate, and my husband, an amazingly awesome spice rack was achieved! It will not fly off the wall, it is secure, and it looks pretty damn sweet.

I was so high on the feeling of accomplishment that I made a second, smaller spice rack for above the stove- haha!
so awesome, right?
Project #2-Under-cabinet trash can
We don't produce a lot of trash around here. As a house of 3 people, we only produce about 1-1.5 trash bags per week, which is pretty good. We also do a fair amount of recycling & re-purposing. The current method we use for recycling is piling it up on the kitchen counter by the sink, which is cluttery and drives me crazy! I decided to install a pull-out cabinet shelves, with a trash can attached! I got it from Home Depot, where I would rather not shop, but I'm not a frequent customer there. Sometimes you cave when ya don't want to..

I'm a big fan of it so far, and I'm thinking about using this as our trashcan (it's 20 qts), and using our 35 qt current trash can as an indoor recycling bin. We'll try it for a week and see how it goes- having a smaller can for actual trash might help us reduce our consumption even more. Ideally, we'd be consuming less, and would be producing a lot less trash overall. Recycling is a good first step, but re-purposing and reusing is really better.


less junky Junk Drawer


Project #3- Junk Drawer organizing
My kitchen cabinet drawers always get really junked up, and it becomes so packed that I can't even open the drawer. In the middle of this project frenzy, I spyed some empty berry containers, and decided to re-purpose them.

I stacked them up against each, and added another basket. Then I took every thing out of drawer, sorted it, and then put things back into the smaller baskets. Things are organized by function now, and it feels good! No more jammed up drawer.


Seedlings!


Project #4- Seed Starting!
Today, I started my first seeds of the 2012 growing season!! To be more specific, my roommate and I started them together; Thai Basil, Lemon Basil, Cilantro, Sage, Cumin, and Spearmint. Also started some Copra and Valenica onions, as well as Speckles lettuce.

I plan to keep the herbs indoors for a while to use in the kitchen and suppliment my current flock, and eventually the onions and lettuce will be transplated outdoors to my garden.

We're in the home strech, my friends- only 15 weeks until Southeastern Michian's Frost Free date- May 16th!

What home projects have you been eyeing recently?

Saturday, February 4, 2012

Make your own Spice Rack (pt 2)

This is a continuation, so if you didn't catch the first part, check it out here.
Now that you have your materials, you might need to cut them to size. If you've gotten your boards from a hardware store, they will probably cut them for you for free. Once you've got 'em cut, bring 'em home- they're ready to assemble!

First, you need to make marks where your screws will go to attach the board to the shelves. For each shelf, start 3 inches in on the back board, and space your holes out (I used a spacing of 8 inches between screws). Mark where the holes should be on the board with a pencil, and then drill straight through the back board.  I used a 1/8ths bit.
Once you've got your basic holes laid out, you can use a counter sink bit. This allows you to drill right over your existing hole on the back board, and drill a conical hole. The benefit of this is that the top of your screw will be flush with the board, and when you paint the final coat, you won't be able to see the screws, or at least they won't be as noticeable (see the pic below for a before countersink picture)

Drill your woodscrews through the countersink holes, through the back board and into the shelves, one by one. I like to start by partially screwing in one screw on the left side, partially screwing in the middle screw, then partially screwing in the end screw; this way I can make small adjustments and I make sure everything is equally tight across the board (haha!).

Now you should have a flat back board with two shelves attached to it!


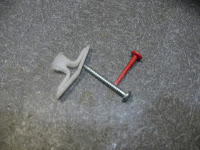
mollie, screw, and the red piece
Next steps are easy:

  • Paint it!
  • Paint another coat on it!
  • Let it dry for 6-10 hours (this is the hardest part for me!)
Last step is to measure out your last set of holes- the ones that will screw the hole spice rack into the wall. To do this, lay your spice rack on the table, face up (shelf side up). Take that pencil you had earlier, and mark out where your screws will go- again I'd go with starting 3 inches in and spacing every 8 inches, but it depends on what sized rack you're making.

Once you've marked out the holes on the board, carefully and accurately mark them on the wall as well. Take your drill, put on a 5/64ths bit, and drill your wall holes. These holes will be bigger than those you drilled for the shelves- these holes are for the mollies.

Pinch the mollies and position them over the holes you've drilled, then tap them in withe a hammer. Once they're as flat to the wall as they can be, take the red piece, and put it into the hole on the mollie. You're pushing until the back of the mollie pops out into the wall. 

Now drill holes into your board with the 1/8ths inch bit, like you did for the shelves. You'll be drilling into the front this time. When you're done with those, you'll want to use the countersink (if you have one) to make those holes a better, conical shape.

You're ready now to drill the screws through the backboard and into the wall (through the mollies). Make sure your board is lined up with the mollie holes correctly- this is a point where you might want a friend to help you hold the shelf up in place.

If you did it right, a) your spice rack should be attached securely to the wall and b) you should have screwed the screws in really tight, and when you run your hand across the board where the screws are, they won't protrude higher than the board! If this is the case, you can use some wood putty and caulk over the holes. Let that dry, then you can paint over the caulking, and you'll have a nice, finished looking product!

If you were like me, and your countersinking didn't get your screws at flat to the wall as you wanted- it's still ok- I'd recommed just painting over the screws, one or two coats. In the long run, you still have a nice spice rack with disgued, incognito screws. Go ahead and put those spice on there!

                                                                          Nice Rack!

Tuesday, January 31, 2012

Make your own Spice Rack- Part 1

I'm not that handy, friends, when it comes to building things. If it involves a drill and a wall and a picture frame, I'm AWESOME at it. If it involves a drill and wood and a saw and measuring acurately and patience, I'm not as awesome. Usually, my impatience wins, and I end up with a crappy looking poorly-made project.

This spice rack was about to meet that same fate- two boards, hung hapazardly on a wall. Then I brought it home to my dad (Nope, 26 years old is not too old to bring a project home for your parents help). What resulted from that assistance was this great idea that I will share with you:

                                         How to Make a Spice Rack (pt 1)

To begin, envision the space where you'd like your spice rack to hang. I decided that the area under my cabinets was just calling out for some better storage so this is my intended destination.

Now, you need to measure the space.
Figure out the height and width of the open space, and jot it down. Also, sounds silly, but measure your spice jars, and write down that height as well.

Next, figure out how many spice jars you'd like to store on the spice rack, and do some calculations. The things you need to know are:
  • How many spices do I need to store?
  • How many shelves will fit in the space?
  • How will I suspend the shelf on the wall so it is sturdy?
The spice rack I've designed is an under-cabinet one. It will be screwed into the wall, and it will hang- not sit on the counter. The space I had to work with was 40" x 19" total, and I also had to factor in the outlets and decide if I wanted to incorperate those into the design or not.

Now you've gotta get the supplies! Maybe you have some spare boards lying around, or maybe you have to go to a big box store, as I did, to get some boards. Make sure you have your measurements written down- you'll need 1 large board that's 1/2 inch thick that is the total size of your open space (40x11 in my case), as well as some smaller 1 inch board for the actual shelves themselves. Many box stores have standard sizes of lumber- here's what I ended up getting:
  • One 1"x4"x8' board for the shevlves
  • One 1/2"x2'x4' for the backing
  • One quart of Valspar latex enamel paint in "Satin Java Brown"
  • a paint brush
  • One box of 8x1-1/4 wood screws (100 count)
  • 1 package of Plastic Toggle 3/8-1/2" Drywall anchors (holds up to 143 lbs)
Tomorrow, I'll post the next part- the actual building, assembling, and installation of your very own spice rack! Stay tuned!

Wednesday, January 11, 2012

Book Review- Edible Front Yard by Ivette Soler

Totally recommended!

For the holidays, I had a lot of books on my list. One of the ones that I got and really loved is, Edible Front Yard by Ivette Soler. The Edible Front Yard is the (and I quote), "Mow-less, Grow-more plan for a Beautiful, Bountiful Garden". 

The book starts out in Chapter 1 with "Inspired Curb Appeal"- basically a whole chapter devoted to your inspirations for gardening, and motivating you to think about your house features, your dream garden, etc. Really a fun chapter! Chapter 2 is probably my favorite and the most useful, in my opinion- it goes through Edible Ornamentals- basically the nicest-looking varieties of a lot of your favorite fruits and veggies. Bronze fennel, espalier apple trees, African Blue basil, lavender, borage- all things you can either eat or consume in one way or another, but they are also just damn good-looking 
plants!

I was so inspired that my roommate and I put in an order for lotsa Herb seeds to start and keep indoorsHere's our order: Globe Bail, Mrs. Burn's Lemon Basil, Thai Basil, Cilantro, Cumin, Bronze Fennel, Green Culinary Sage, and Spearmint! Hopefully these will be attractive, product plants that will be a breath of fresh air indoors and a pretty addition out in the front yard when it comes time!

Tuesday, January 10, 2012

Over-wintering Herbs Indoors

from L (Rosemary, Thyme, Lemon Thyme, Rosemary, Oregano)
If you like to cook, as I do, it's a little sad to switch from using freshly-picked herbs from your garden in the Summer and Fall to the store-bought dried ones during Winter. This year, I made an effort to dry some of the herbs I use most- basil, rosemary, oregano; its been great to have those to utilize. I decided to try bringing some of my favorite herbies indoors for the winter, to see how they do.

They've been under grow lights- just standard fluorescent shop lights in my hook-up in the basement- for about 3 weeks, and they seem to be doing pretty well! I also just placed an order for some more herb seeds, so I'm going to try starting some and keeping them indoors until they're ready to go outside. This will be my first time starting herb seedlings, so we'll see how it goes, and I'll keep you posted!