Showing posts with label raised beds. Show all posts

Saturday, August 11, 2012

Planting in Late Summer for Fall & Spring Harvests

This is the year that I'm going to do it, guys- make the leap and do some serious Fall planting! I think I'm usually tuckered out by the time the end of the summer rolls around. Before I know it, the time to plant for fall has passed me by. Not this year!

I'm been direct seeding Fall veggies in my garden for the past 3 weeks now, and I will finish up the last bit of planting tomorrow. If you're in S.E. Michigan, Northern Ohio, or a place with a similar last frost date (Oct 7th), you still have a few days to hop to it!


Fall Planting list:
Super Sugar Snap Pea
Prize Choy
De Cicco Broccoli
St. Valery Carrot
Grandpa's Admire Lettuce
Winter Density Lettuce
Parade bunching Onion
Rhubarb Red Swiss Chard

I've tried to seed most everything in the new, larger bed (pictured on the left)- it's closest to the side door of our home so if I need to dash out during the winter I'm one or two steps closer, and it already has crazy, thriving Kale there.

I'm planning to put up some quick hoops over the first 8 feet of the bed, enough distance to cover up the Kale, fall onions, and sugar snaps. I might want to do another 8 feet of hoop down at the other end (by the lovely garbage bins), because there are broccoli, a few carrots, and some speckles lettuce down there!

I'll be sure to share pictures of the quick hoops once I get them put together, as well as some guidance and assembly photos. I've been wanting to do serious season extension for a long time, and it will finally happen this year! One step closer to that ideal Badass Garden that's always floating in my mind...

What are you planning on planting this Fall?

Friday, August 3, 2012

Friday Favorites

Good morning! Here are some of my favorite things this morning- things I'm loving, and things I'm thankful for!

Tomatoes!


Tomato basil & mozzarella salad- lunch or dinner every day this week!


Canning- it is pretty awesome.


The garden is still looking green, despite the heat. 
I think the straw mulch is helping!

Happy Friday! What are your Friday Favorites?

Thursday, July 19, 2012

DIY Plant Labels out of Used Canning Lids


Since I am lucky enough to be featured on a local urban garden tour on Saturday, I have been spiffing things upon around the gardens here. Weed-pulling, plant staking- all those fun garden chores that seem to slip past me for weeks at a time! 

One of the projects I tackled today that I'd be meaning to get to for a while is plant labels! I looked at buying plastic or wooden labels, those awesome pinterest spoons, event popsicle sticks, but the idea of purchasing something new to label plants for 3 months just seems a bit wasteful. 


My mom was in town and we were brainstorming creative ways to re-use materials and also create plant labels are functional: Big enough to read, Eye-catching but not an eye-sore, and Tall enough so people don't have to squat down to see them! I'm pretty satisfied with what I ended up with, so I'll share the glory with you!


DIY- Canning Lid Plant Labels


Supplies needed:

Used (already canned-with) Wide Mouth jar lids 
2 pkgs. Floral Cloth Wire 
Duct Tape 
Permanent Marker

Seed Packets for reference 
the internet, to look up latin names if necessary

Directions: (This is real easy, friends!)
  • Sort through your seed packets and set out any that you planted in the garden this year on your table, essentially making a list.
  • Flip all the lids white-side up and make sure they are clean and blemish free
  • On the white-side of each lid write the plant type in large letters straight across the middle of the lid in permanent market
  • Write the variety across the top of the lid, in smaller-sized writing. I chose to add quotation marks too.
  • Write the latin name of the plant across the bottom of the lid, again in a smaller size
  • Once you are finished with the entire pile of lids, get out your floral wire
  • Bend each wire in half, leaving a sort of upside-down "U" shape at the top
  • Flip all your lids over, careful to set them down so the text is aligned and straight
  • Tape a bent floral wire piece to the back of each lid, and press the tape down around the wire so it's secure
Now label up those mystery plants!

Wednesday, July 11, 2012

What's Up Wednesday

Heirloom tomatoes are freaking gorgeous!


Whoa- onions are popping out of the ground! I'd better tuck them in.


Ole' Faithful a.k.a. kale


These Yolo Sweet peppers are cherry-sized right now , 
but getting bigger each day though.


If you are looking for a cucumber variety, 
Spacemaster are fairly compact and they are dang good.


I see some empty spots for more veggies, don't you?


What's Up in your Garden this week?

Wednesday, May 23, 2012

What's Up Wednesday


Most of the herbs I started indoors are establishing outside really well! The cilantro is starting to bolt though- I think I'll start those from seed outdoors next year.

The walking onions I got from my neighbors look so fun- they have little curly tails and they'll start to flower soon- if I'm correct I think they'll start to bend down to the ground and will spreads!

The Leeks are fattening up, finally. Every day I want to pull them out and eat them!
Woah! So green, right? Makes me happy every time I look out the window :)


What's Up in your Garden today?

Wednesday, May 9, 2012

What's Up Wednesday

The Bloomsdale Spinach I planted from seed in the garden is doing great- 
look how big it got in the past few weeks!

From near to far: Kidney and Provider Bush Beans, Potatoes, Carrots and 
 Leeks, Lettuce, Kale, and Onions! Woo- what a green garden!

Carrots are going wild- I'll need to thin them soon

Genovese, Thai, and Lemon Basils newly transplanted outdoors.

You wouldn't know it from the picture, but this is an Apricot Tree! :) So cute.
What's Up in your Garden this Wednesday?

Sunday, May 6, 2012

Silent Sunday

I <3 Hostas 
Sage in the front porch pot
Potato Plants
Chives are in bloom
Garden is greening up quickly
Happy Sunday- Enjoy your day :) Stay tuned on Tuesday 5/8 for an exciting giveaway!

Thursday, April 26, 2012

Herbs in the Garden


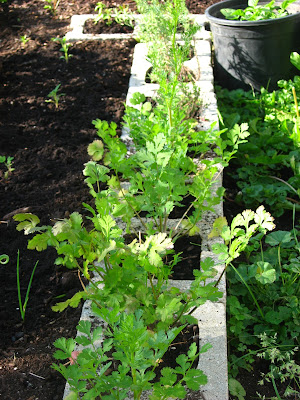
I have big plans to plant a lot of herbs in my outdoor gardens this year. The double-edged sword of concrete block raised beds is the 2 openings in each block- they're a great space to do some extra planting, but they're also a fun space for weeds to quickly crop up!

For the past several years, I've just planted herbs right into the garden, but as I expand my plant list each year, space is at more of a premium. So this year I thought, "Why not plant herbs right into the blocks themselves?"


I'll dry some of these herbs, use some fresh- when you grow them yourself, herbs are so much more flavorful! They add a lot of zing to dishes, they're pretty, and fragrant too- what's not to love?

So far, I've taken a few of my indoor herbs and transferred them back outside- two rosemary plants, an oregano, and a thyme plant. I also had a few lemon thyme plants that survived through the winter, and they got plopped into the holes as well.

They're handling the transplant well! Also inside under lights, waiting to be transplanted are Globe basil, Thai basil, Lemon basil, cilantro, sage, chamomile, lemon balm, bronze fennel, and more thyme. All in all, I'll have about 20 herb plants ready to line some of the raised beds out back.


What types of herbs do you have planted in your garden? 


Any new ones in the plans for this year?


Sunday, April 22, 2012

Silent Sunday


 Chives!
    
'Speckles' Lettuces looking beautiful in the garden

Kale and onions in the side yard bed
 
If I can get my hands dirty in the garden, it's a good day.

Happy Sunday :)
     

Friday, April 20, 2012

Tour of my Urban Garden


I spend a lot of my time on this blog posting about my garden and the veggies & fruits within it. I thought I'd give an overview of all the food-growing space I have, so those of ya'll who are interested enough to visit again could better visualize the space!

We live on a small city lot, between two streets that forks out in a "V" shape. The lot is about 1/10th of an acre- pretty small! Right now, all of the edible gardening I do, minus some herbs like lavendar and russian sage, are in the backyard. Currently. nearly one whole side of the backyard is devoted to edible gardening. Here's more about the spaces I grow in, and what I grow there!

Vegetable Beds

Raised Bed gardens
First stop on the tour is my vegetable gardens, and my favorite part of my outdoor space!  My veggie gardening mostly happens in concrete block raised beds, which we installed over the past several years- first we started with just the "S" shape you see in the foreground of this picture. The next year, I added the little tail that extends it closer to the house, and then this past fall I added a whole other section that runs up the side of the house up to the front fence.  All in all, this area totals about 260 sq ft.


What's planted in this space is the bulk of the vegetables I grow throughout the year.

Staples always on my planting list include:
potatoes, onions (sets, seeds, or transplants), tomatoes, carrots, peppers, lettuce, bush beans, and garlic.


New additions this year include:

spinach, kale, leeks and sugar snap peas.
Asparagus bed
This season, I cultivated a 10 ft x 1ft Asparagus Bed on the Right side of the house. I haven't seen much action out there so far, but I'm hoping these plants establish. I chose two varieties- Jersey Knight, and Purple Passion. They're a nice addition to the variety of edibles I grow!

We'll see how they do. Anyone have any asparagus advice?


Space for Herbs
During the Spring-Fall, I start seeds indoors using my homemade seed starting shelves. During the Winter months, these shelves have another function- keeping alive more tender herbs that wouldn't produce well outdoors!

This is the first year that I bought/brought in herbs for the Winter, and while I didn't have enough to use them tpo often, it sure was nice to use a little homegrown oregano or thyme now and then!

I ended up planting all the herbs outdoors, in the holes of my cinder block raised beds!

Backyard Fruit
In my backyard, I have several fruit areas, where I've taken advantage of space and sun to grow some sweet treats!

Raspberries
As of this year, I have 7 black raspberry canes- 4 along the back inside fence, and 3 that I transplanted on the side of the house by my raised beds. These really produced for the first time last summer, and it was such a pleasure to walk out back and pick a few berries! The canes I have (not sure what variety I have) produce small, purple/black berries that are really sweet.

Apple Trees
In addition to raspberries, we also have apple trees (planted super-close to the garage for some reason) and several small blueberry bushes.
The apple trees produce small apples that squirrels love to pick off and throw around my yard and eat. This season is going to be the season that I show those squirrels who's boss. I want to eat a few apples, damn it!

Blueberry bushes
The blueberry bushes have been kind of overshadowed in weedy beds for the past several years so this year I dug them up and re-planted them where the majority of the raspberry canes are. I hope they do better in that location- it would be great to have a small, steady crop of blueberries.

I'm also supposed to be getting an apricot tree delivered soon- still looking for a home for that!


Dwarf Cherry trees
We purchased these two dwarf cherry trees last year although one was mis-labeled as an apple tree- whoops! Last year we harvest 1 cherry from each tree which cracked me up! There are lots of blossoms on the trees this year and they've grown some- crossing my fingers for like 8 cherries per tree this year!

In the future, I'd love to add some grapes, as well as some hardy kiwifruit. Both of those grow well on arbors and trellises and it is easy to find cold-tolerant varieties. It's important for me to not get too carried away though- I want to make sure I can manage the garden and plants that I have now and make sure they are healthy and fruitful!

Sunday, April 15, 2012

Silent Sunday

Newest backyard bed- Speckles Lettuce and Leeks

Sugar Snap Peas
Mountain Rose Potatoes curing before they are planted
Salad- Spinach from the farm at work, lettuce from at the garden at home!

Happy Sunday :)

Monday, April 2, 2012

Pre-Potato Planting Prep

I love getting packages in the mail- especially when they're full of potatoes! Today, 12 lbs of potatoes arrived for me via UPS from Seed Savers Exchange- woohoo! (Aren't the neon mesh bags they came in sort of amazing?) After having planting potatoes for the past several years, it was a lot quicker this year deciding what varieties I wanted to grow.

Both Yukon Gold (80-90 days) and German Butterball (100-120 days) potatoes have yellow flesh, which I tend to prefer over white flesh. German Butterballs are described as "Russeted skin and buttery yellow flesh"- Mmmm! Mountain Rose (70-90 days) potatoes have a red skin and a pinkish flesh- I think they'll be really pretty in my favorite potato salad recipe! Rose Finn Apple potatoes (80-100 days) are a fingerling potato- also deemed as "perfect for potato salad". 

Another factor in my decision was the length of the growing season for each potato- Since I'll plant them at roughly the same time, I chose varieties that will have staggered harvest dates. I ended up ordering 2 and 1/2 lbs of each of these varieties. I'll be sharing some of the order with a neighbor who's also into gardening and is part of the Grower's Co-op group I mentioned in yesterday's post. Again-yay for sharing! :)

The next for these potatoes will be to get set out in the mudroom for a week- it's warmer out there, which will encouraged them to sprout. The day before I plant them, I'll cut the potatoes into smaller pieces- each piece will be about 2"and will have 1 or 2 eye buds. If the potatoes are really small, you can plant them whole. I'll probably cut most of mine in half. 

Are you planting any potatoes in your garden this year? If so, what varieties are your favorites?

Saturday, March 31, 2012

Build your own Concrete Block Raised Beds

This will be my 4th year gardening in raised beds, and the 3rd gardening in my indestructible concrete block beds! There are many benefits to raised bed gardening, including looser, better draining soil, mitigated risk from toxic and lethal chemicals sometimes found in urban soil, and the fact that they're a bit easier to reach because they're higher up. 

Gardening in a concrete block garden offers all of these benefits, with the additional perk that concrete blocks will not deteriorate like wood beds will. Especially if you get untreated wood (which doesn't leach chemicals into the soil like treated wood does), you could be looking at replacing your beds in 5-8 years. 

If you are thinking about concrete raised beds for your backyard, let me share some tips and steps to create your own awesome garden:


Step 1: Select your garden site
This is a first step for any garden. In general, if you can find a spot that gets sun or partial sun, that will offer you the greatest options in what you can plant. Other considerations- level terrain, proximity to a water source, visibility, potential for expansion. I chose the left side of my backyard, which faces South & was wide enough for a substantial garden.


Step 2: Purchase concrete blocks

You can get concrete blocks from major home improvement stores, or smaller hardwares. I purchased 150 concrete blocks for $200 off of craigslist, which included delivery. At Lowes, they're listed for $1/block, so if you can borrow a truck from someone, that's a good bet. I liked that I was re-purposing my blocks though, rather than buying new.


Step 3: Install landscape fabric/ place blocks

This is where you can get a little creative! Beds can be 1 or 2 blocks high, and as long as you have space for. I find that 3-4' wide is a good distance, otherwise it gets hard to reach your plants in the middle, and easy reach is a big benefit of raised bed gardening! I chose sort of an "S" shape initially, to maximize the space I had available.


Step 4: Order compost to fill beds
Many cities and municipalities make their own compost from the yard waste they collect- Ypsilanti Township and City of Ann Arbor are two place by me that sell compost. Another good source are local landscaping companies or farms that have their own compost sales option. Here is a pretty standard formula for calculation:  To cover an area of 100 square feet with 3 inches of mulch: 100 square feet x 8 inches deep x 0.0031 = 2.48 cubic yards needed

Step 5: Fill beds with compost & Plant away!
This is a pretty self-explanatory step- once you get the frame of your beds all laid out and make sure the concrete blocks are level, you can fill in with compost! I always fill mine to the top and level them out with a rake- the soil will settle a little bit so be generous. If you have extra soil, you can fill in the concrete block holes as well, and use that space for planting flower, herbs, whatever you'd like!
Step 6: Expand beds so they eventually take over your yard (optional)
As you can see, I started with one square bed that was 4'x8'. Before I had even put in compost, I expanded it to be the larger, "S" shaped bed. The next season, I added the tail on the bottom of the "S", and this season, I've added the additional section that runs the length of the side yard (pictured on right). If you're going to grow potatoes or carrots, you can just add a second layer of blocks on top of that section (like I've done in the picture on the right). It's so easy to expand and customize that I've gone from 32 square feet to about 200 square feet in just a few short years- whoops! ;-)

Whether you start small or have visions of grandeur right from the start, concrete blocks are an affordable, sustainable choice for your yard or garden!